Zoals beloofd, hierbij mijn emboss-verftechniek tutorial.
---
As promised, here's my emboss/ paint technique tutorial.
 Benodigdheden
---
As promised, here's my emboss/ paint technique tutorial.
 Benodigdheden
- stansmachine
- stansen en embossing folders naar wens
- drie kleuren acrylverf (voor onderstaande voorbeelden gebruikte ik goud, turkoise en blauw)
- drie penselen
- evt. liniaal en snijmes
- (kranten)papier om je werkvlak te beschermen
- papieren doekjes
- karton. Zwart karton met een linnenstructuur geeft een prachtig resultaat.
---
Supplies
Supplies
- Die cutting machine
- your favourite die and embossing folder
- Three colours of acrylic paint (for my samples I used gold, turquoise and blue)
- three paintbrushes
- metal ruler and Stanley knife
- (news)paper to protect your work surface
- paper towels
- cardstock. Black cardstock with a linen texture gives great results.
- (news)paper to protect your work surface
- paper towels
- cardstock. Black cardstock with a linen texture gives great results.
Stap 1
(Wanneer je een passepartout wil maken, stans dan eerst de gewenste vorm uit het vel karton. Ideale stansen zijn de Cabinet Card stans en de Arch Frame stans van Tim Holtz.)
Leg voldoende papier onder je werkvlak zodat er geen verf op kan komen. Emboss een vel karton met het gewenste motief. In onderstaande voorbeelden gebruikte ik de Swirls Alteration Texture Fade van Tim Holtz en de Budding Vine embossing folder van Craft Concepts.
---
Step 1
(If you want to work with a frame, die cut the shape you want out of the cardboard. Tim, Holtz's Cabinet Card die and the Arch Frame die (also by Tim Holtz) are ideal for this.)
Cover your work surface with paper, enough to prevent paint from leaking onto your table. Emboss a piece of cardstock with the pattern you want. In my samples I used Tim Holtz's Swirls Alteration Texture Fade and Craft Concepts' Budding Vine embossing folder. If your paper is too large for the embossing folder, emboss it two times (see pictures).
Stap 2
Cover your work surface with paper, enough to prevent paint from leaking onto your table. Emboss a piece of cardstock with the pattern you want. In my samples I used Tim Holtz's Swirls Alteration Texture Fade and Craft Concepts' Budding Vine embossing folder. If your paper is too large for the embossing folder, emboss it two times (see pictures).
 |
| 2. |
Doop je penseel in de goudverf en smeer er een paar keer mee over het krantenpapier. Dit zorgt ervoor dat er weinig verf op je penseel blijft zitten. (We gaan drybrushen, dus er mag niet teveel verf worden gebruikt. Het is de bedoeling dat een gedeelte van de zwarte ondergrond onder alle lagen zichtbaar blijft, dit zorgt voor diepte.)
Ga met je penseel voorzichtig over het geemboste vel karton. Kijk hoe de details langzaam te voorschijn komen, mooi he? Het is de bedoeling dat de verf hoofdzakelijk op de verhoogde delen terecht komt. Ik vind het fijn om mijn penseelstreken dezelfde richting op te laten gaan, maar dit is een kwestie van smaak. Doe vooral rustig aan.
---
Step 2
---
 |
| 3. |
Dip your paintbrush in the golden acrylic paint and smear it a few times over the newspaper. This makes sure that most of the paint is wiped off. (We are going to drybrush, so it's crucial that your brush doesn't contain a lot of paint. The black surface of the embossed cardstock still needs to shine through a bit through all the layers, this adds depth to the finished product.)
Wipe the brush carefully over the embossed piece of cardstock. Look how the details slowly seem to appear. Magical, isn't it? Make sure that the paint mostly ends up on the raised surfaces. I like my brushstrokes going in the same direction, but that's a matter of personal preference. The most important bit of this step is to take it slow.
 |
| 4. |
Neem een ander penseel en de blauwe verf en werk volgens bovenstaande techniek. Zorg ervoor dat er ook nog wat goudverf zichtbaar blijft.
---
Step 3
Work in the same way with the blue paint. Make sure to let some of the gold paint shine through.
Stap 4
Werk volgens bovenstaande techniek met de turkoise verf. Werk spaarzaam met deze kleur.
---
Step 4
Step 4
Work in the same way with with the turquoise paint. Use this colour sparingly.
 |
| 5. |
Stap 5
Voeg met de goudverf tenslotte nog wat highlights toe.
Wanneer je niet tevreden bent met het resultaat, werk het dan gerust met de andere kleuren bij. Let er alleen wel op dat de zwarte ondergrond gedeeltelijk zichtbaar blijft. Teveel verf kan het effect verpesten.
---
Step 5
---
Step 5
Add some highlight with the gold paint. If the end result doesn't please you, feel free to add some of the other colours. Be careful not to add too much paint, this can ruin the result. As long as some of the black cardstock shines through, you´re fine.
Stap 6 (indien je werkt met een passepartout)
Stap 6 (indien je werkt met een passepartout)
Wanneer je karton een uitgestanste passepartout heeft, is het mooi om deze extra te benadrukken met goudverf. Zie onderstaande voorbeelden:
---
Step 6 (if you are working with a frame)
If you have a frame, it's nice to emphazise the cut out area with some gold paint. See the examples below:
---
Step 6 (if you are working with a frame)
If you have a frame, it's nice to emphazise the cut out area with some gold paint. See the examples below:
 |
| Gears Alterations Texture Fade embossing folder, Tim Holtz |
 |
| Gears Alterations Texture Fade embossing folder, Tim Holtz |
Ook zonder geemboste ondergrond kun je met linnenkarton een mooi resultaat behalen:
---
Even without the embossing the cardstock with linen texture gives beautiful results:
---
Even without the embossing the cardstock with linen texture gives beautiful results:

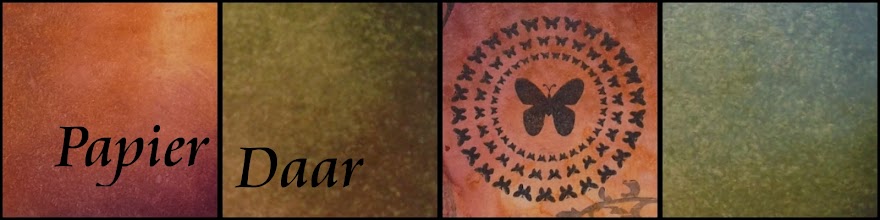
Of gebruik eens een andere kleurencombinatie (rood, bruin en goud):
---
Or use a different colour combination (red, brown and gold):

No comments :
Post a Comment
Bedankt voor je bericht!
Thank you for leaving a message!